Overview
This project evaluates TPMS (Triply Periodic Minimal Surface) lattice heat sinks—Gyroid and Schwarz-D—for electronics cooling under two operating configurations:
- 1-CPU: single heat source
- 2-CPU: dual heat sources sharing the same copper/spreader → heat sink path
I used an industry-style workflow:
1) First-pass design with thermal resistance networks and a MATLAB model
2) Validation with Fusion 360 thermal + flow simulations (natural vs forced convection)
3) Decision using clear Pass / Fail outcomes
Project Files
Design Logic
At a high level, the temperature rise is governed by:
- Conduction path: junction → chip/package → TIM → copper/spreader → TIM → heat sink base → lattice body
- Convection path: lattice surface → ambient air (this becomes the bottleneck without a fan)
Instead of relying only on CFD visuals, the resistance network makes the dominant limiter obvious:
- with low airflow → R_fin,conv dominates → temperatures explode
- with forced airflow → convection improves → lattice geometry and effective surface area become meaningful
The thermal budget is set by a maximum allowed junction temperature:
\[T_{j,max} = 85^\circ C,\quad T_{amb} = 35^\circ C \Rightarrow \Delta T_{budget} = 50^\circ C\]A scenario is marked:
- Pass if max component temperature stays within the limit
- Fail if it exceeds the limit
Thermal Resistance Networks (Correct topologies)
1-CPU Network (series path: $T_j \rightarrow T_{ambient}$)
Network meaning (1-CPU): all resistances are in series, so: \(T_j - T_{ambient} = Q \cdot \left(R_{chip}+R_{TIM,CPU}+R_{Copper}+R_{TIM,HS}+R_{HS}+R_{fin,conv}\right)\)
Note: $R_{fin,conv}$ is the convection resistance from fin/lattice surface to ambient.
2-CPU Network (two sources merge into shared copper/spreader path)
Network meaning (2-CPU):
- each CPU has its own local interface resistance into the copper/spreader region
- both heat flows then share the downstream path (R_Copper → R_TIM,HS → R_HS → R_fin,conv → ambient)
This coupling is why 2-CPU is the real stress test.
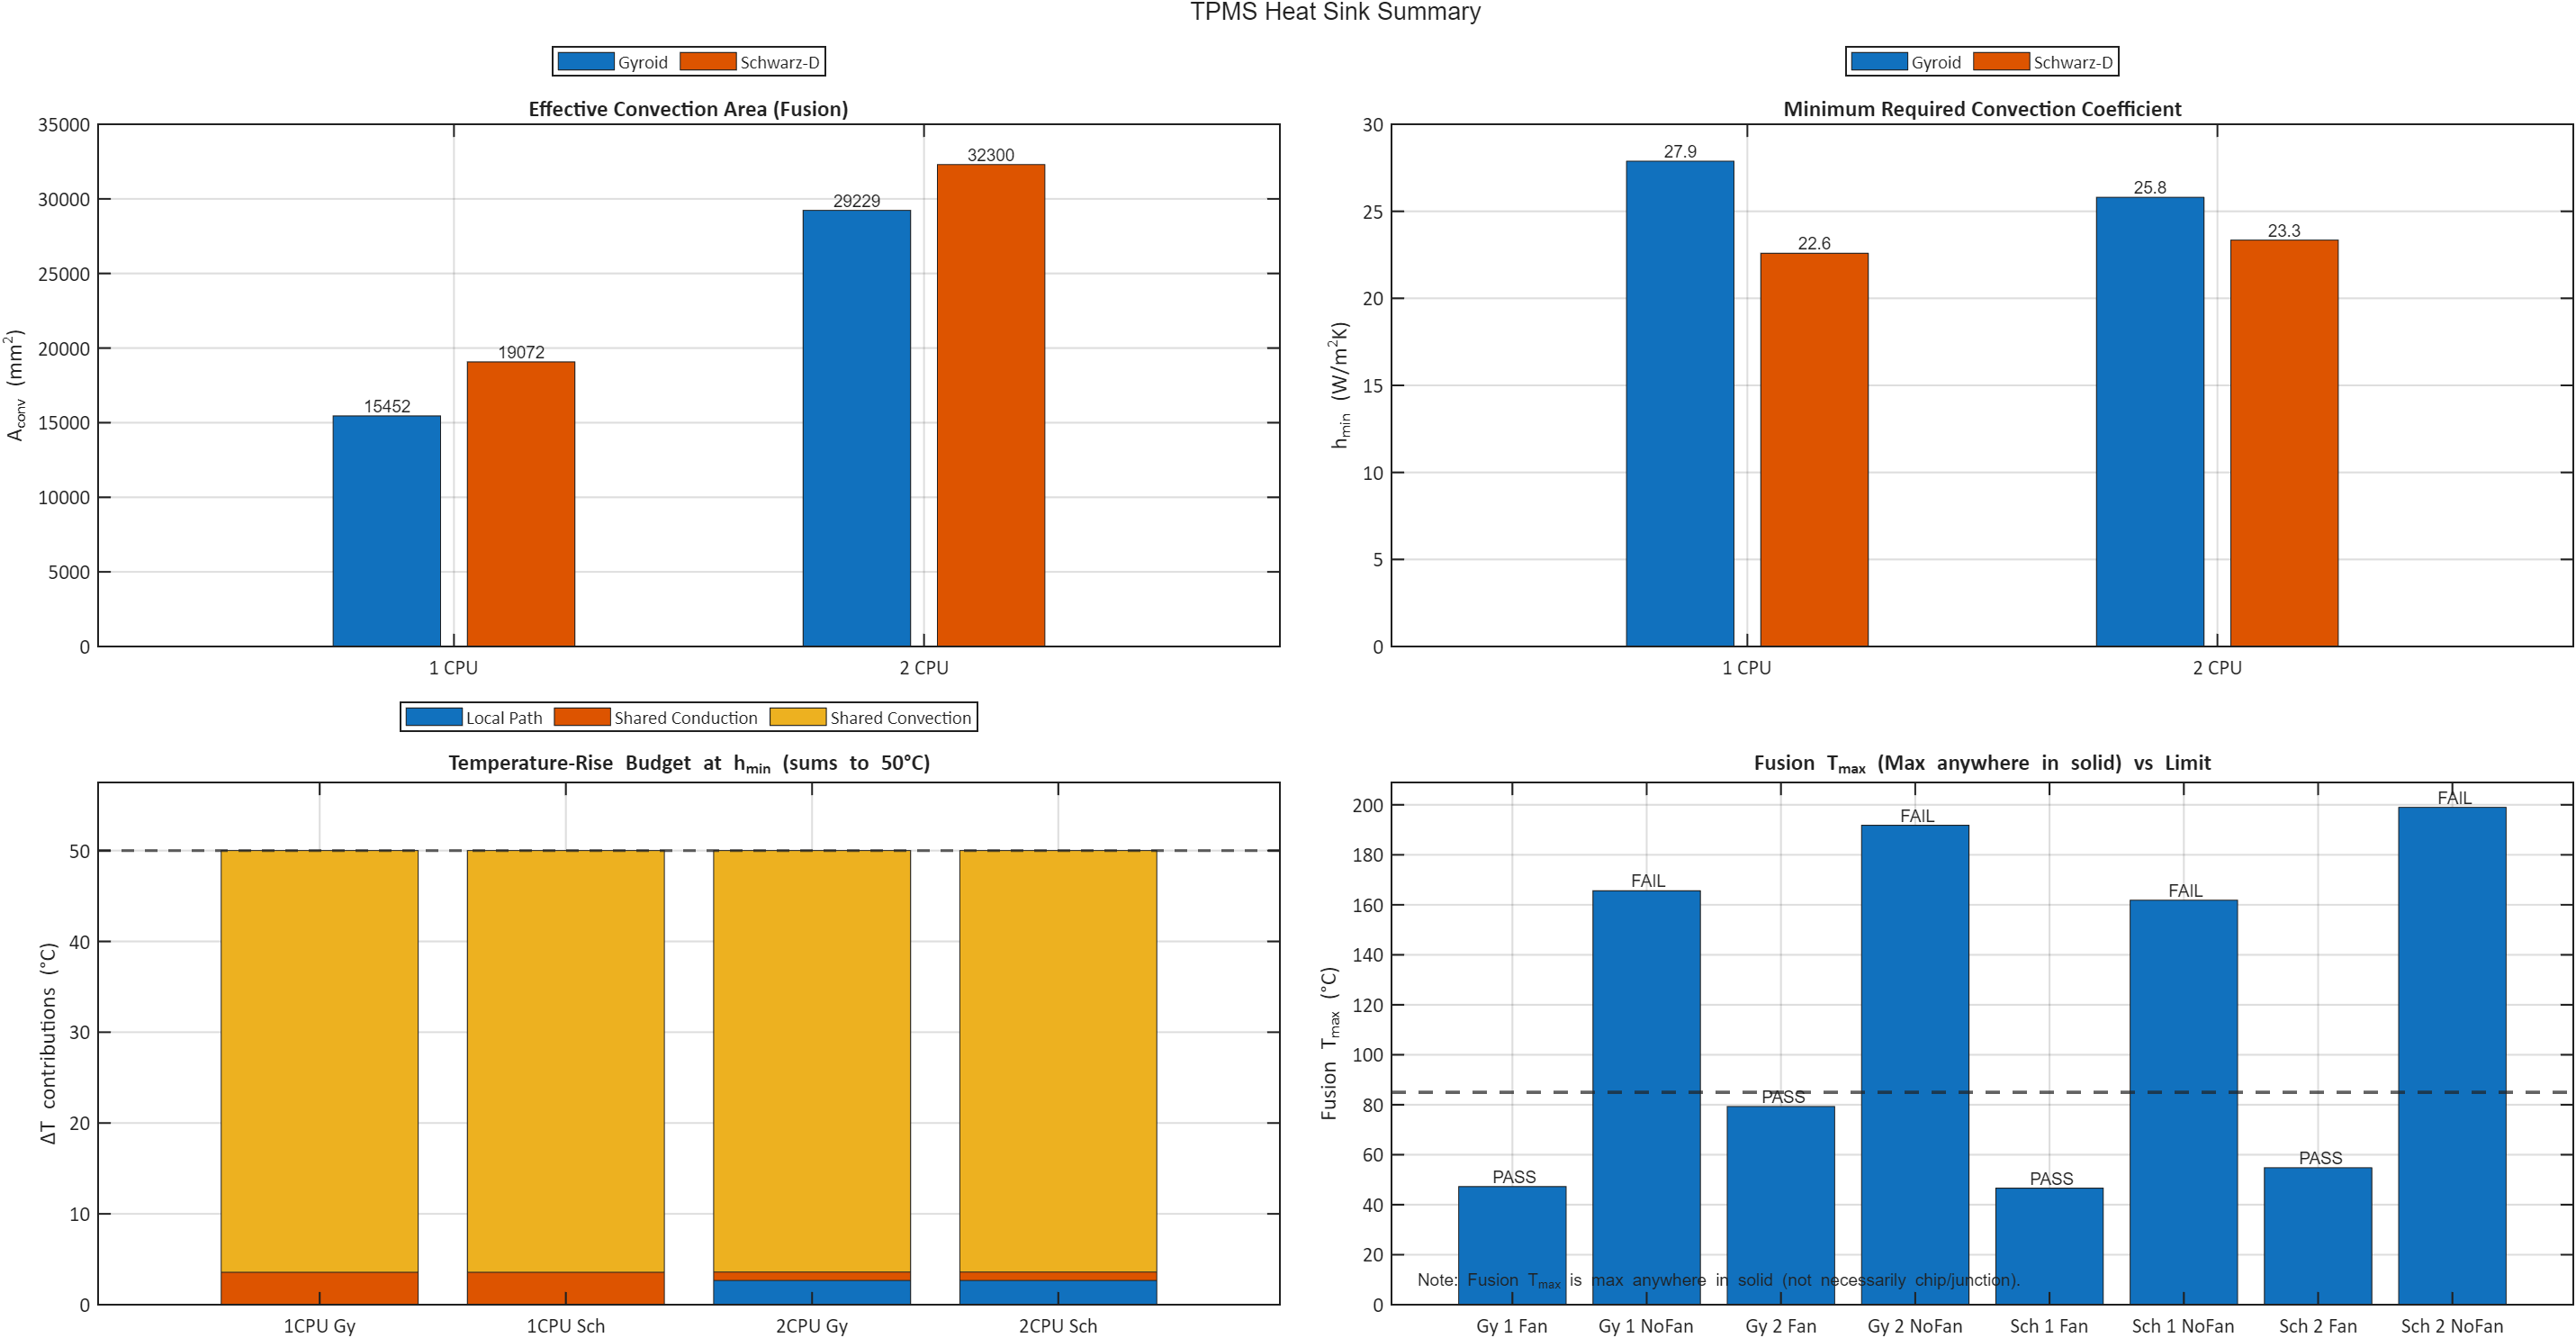
Analytical Summary (from the MATLAB sizing model)
The MATLAB model uses the above networks with:
- effective convection area (from CAD)
- conduction resistances (layer thickness, k, contact areas)
- and solves for the minimum required convection coefficient (h_{min}) to remain within the allowed temperature rise budget.
This is what the summary dashboard captures:
Fusion 360 Validation (Flow + Thermal)
I validated the trade study using Fusion 360 by comparing:
- airflow penetration / flow-lines
- maximum component temperature (peak anywhere in the solid)
Natural Convection (No Fan) — Fail cases
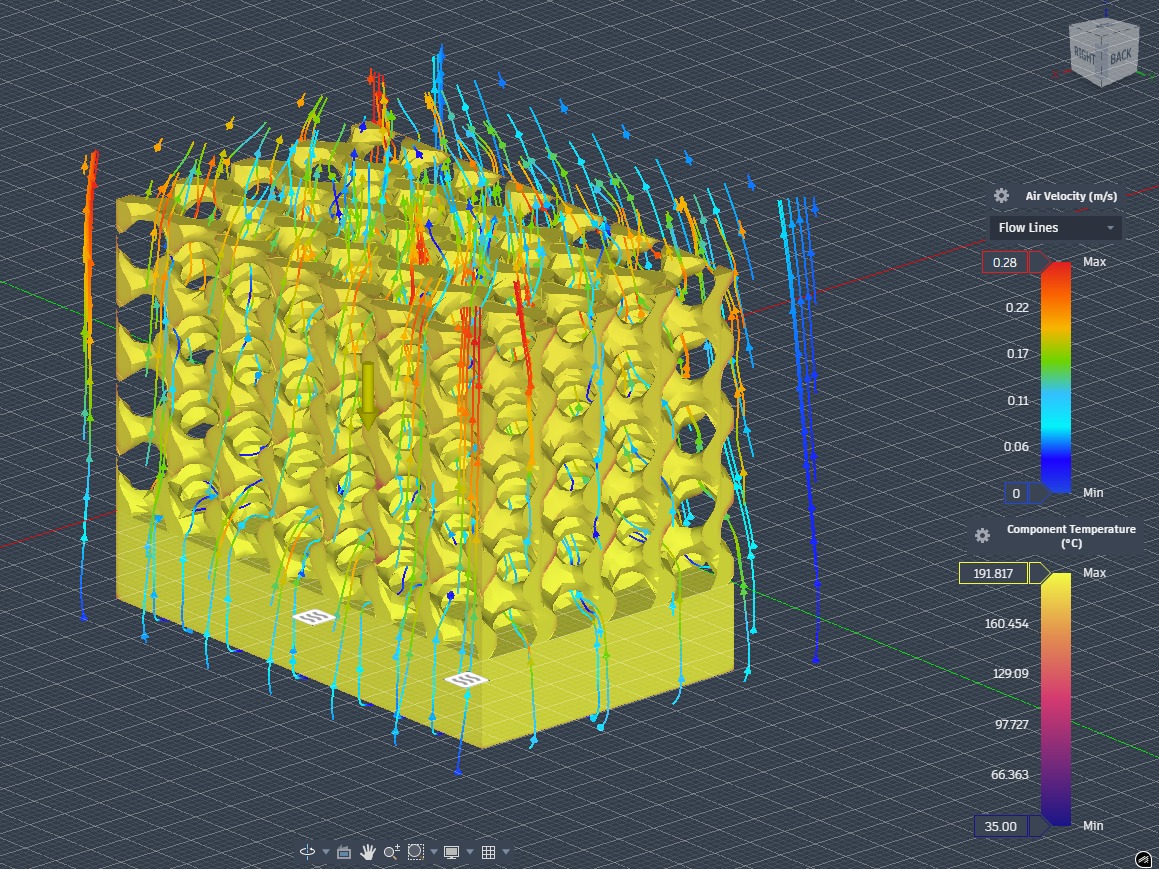
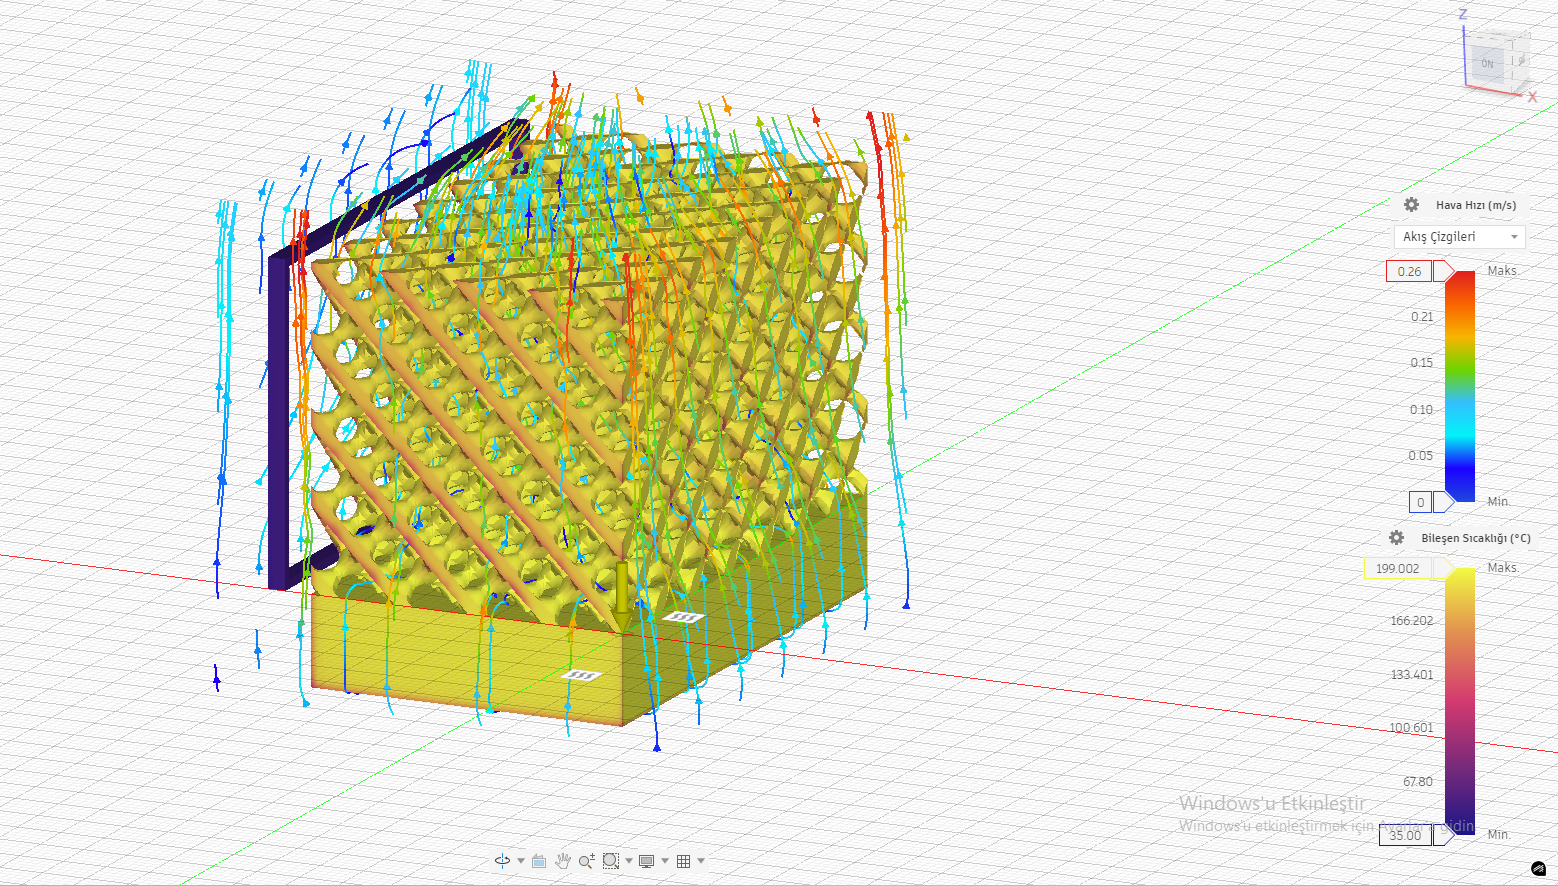
Low airflow (≈0.25–0.28 m/s) makes convection the limiting resistance (R_fin,conv dominates). Both geometries overheat.
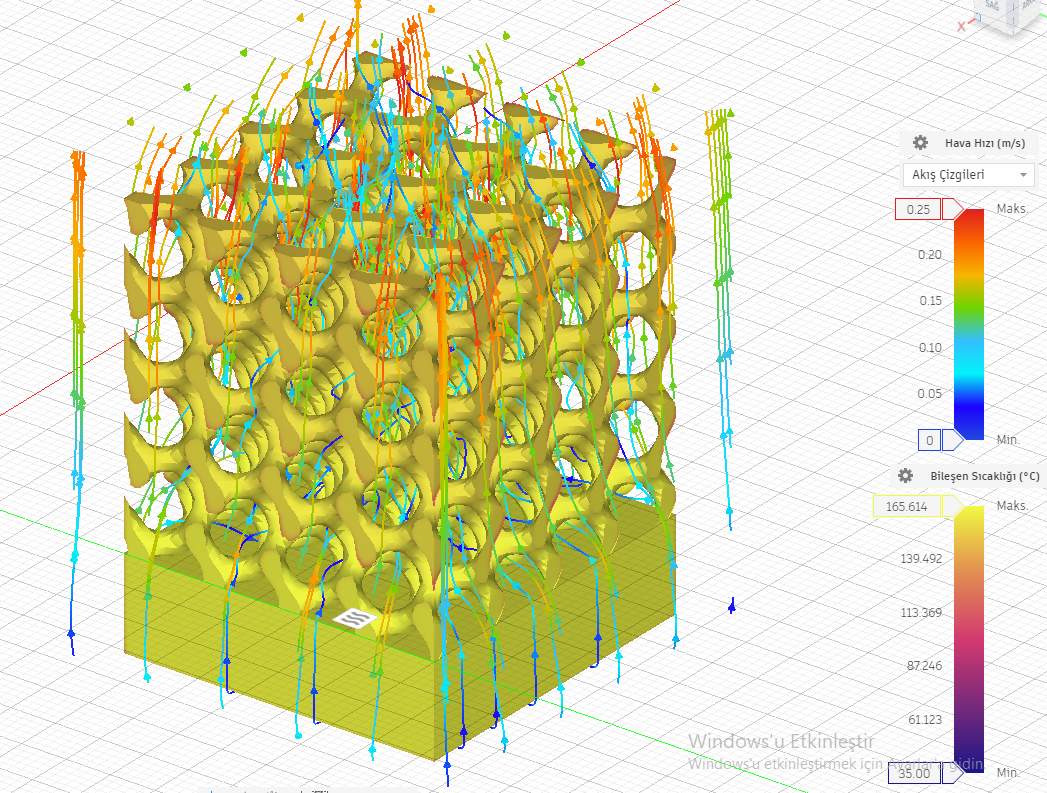
Gyroid — 1 CPU (No Fan): Fail
(0.25 m/s, 165.614°C)
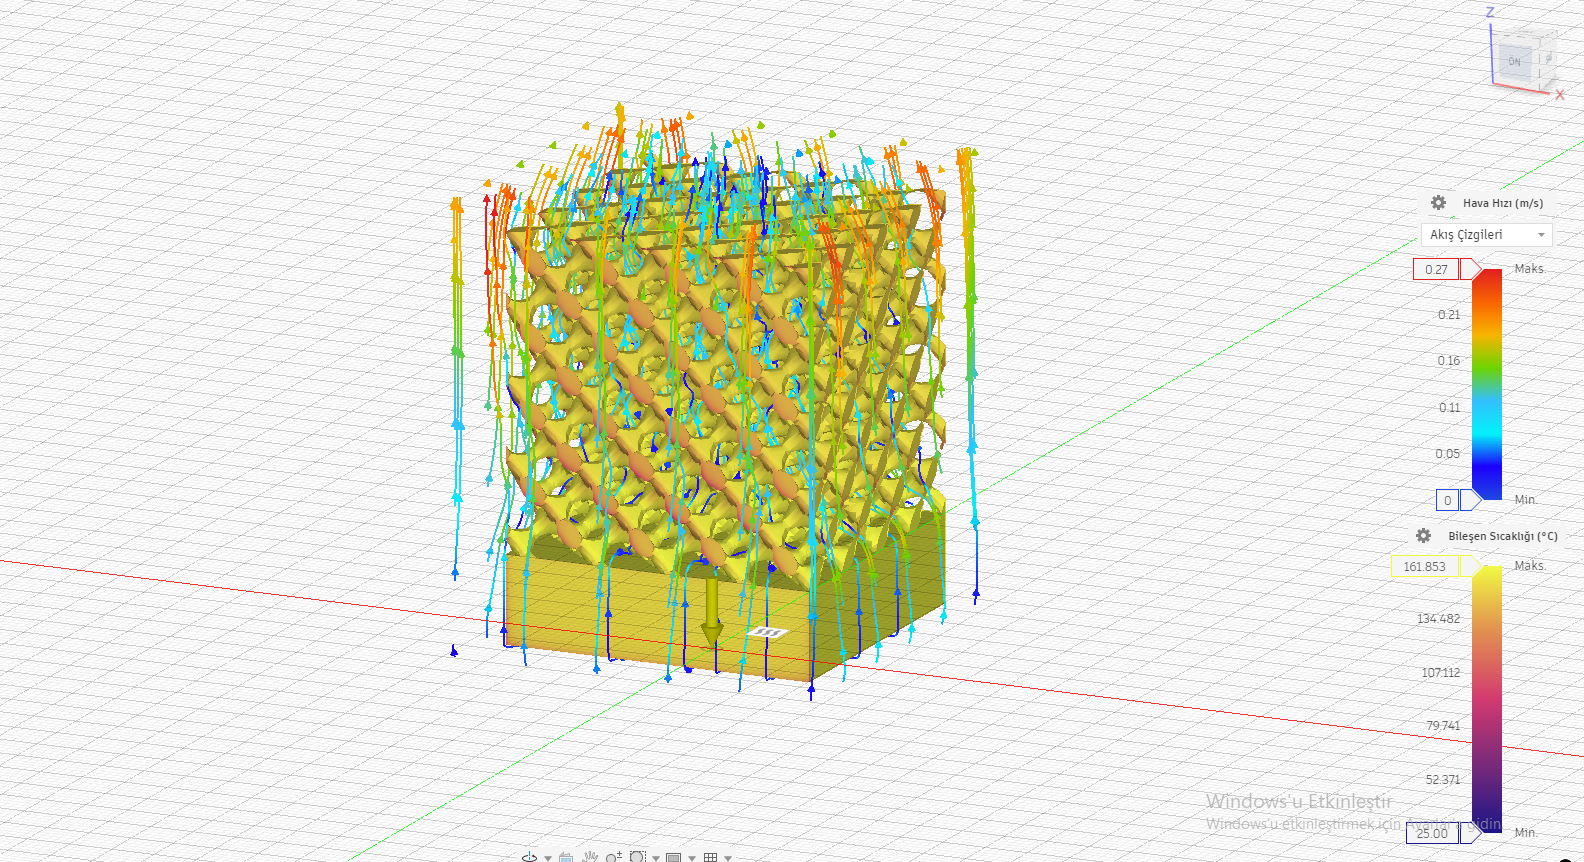
Schwarz-D — 1 CPU (No Fan): Fail
(0.27 m/s, 161.853°C)
Gyroid — 2 CPU (No Fan): Fail
(0.28 m/s, 191.817°C)
Schwarz-D — 2 CPU (No Fan): Fail
(0.26 m/s, 199.002°C)
Forced Convection (With Fan) — Pass cases
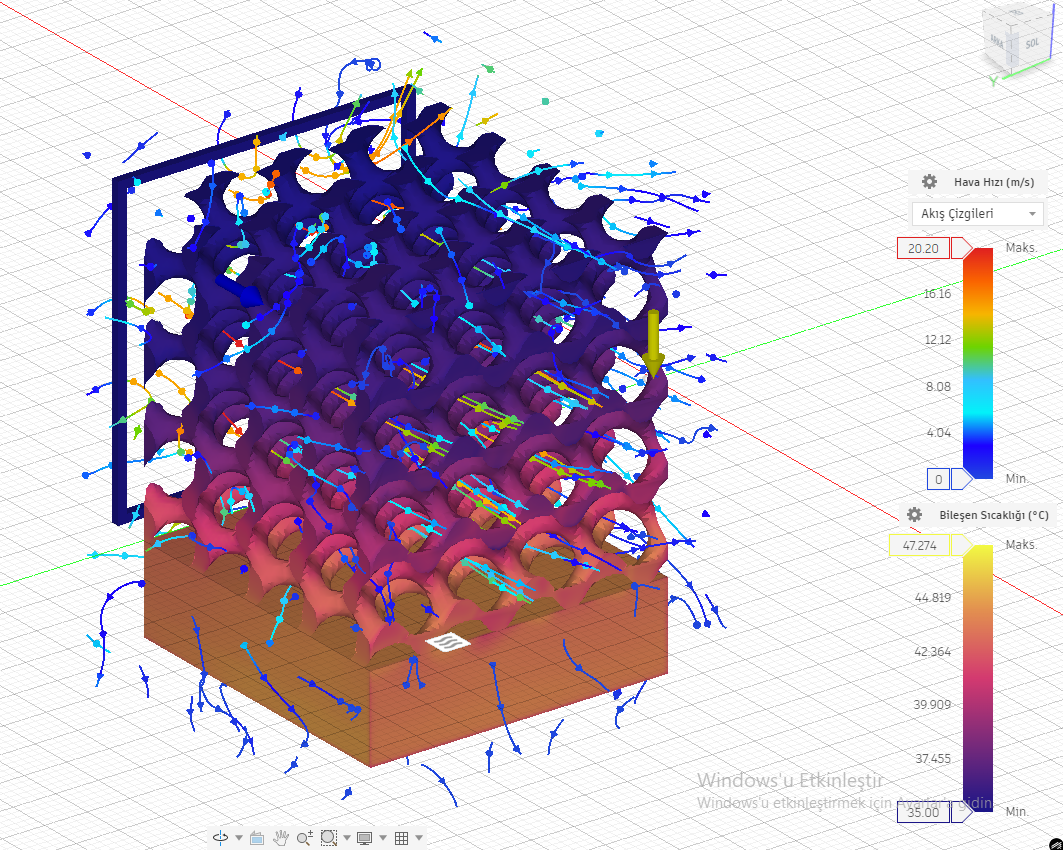
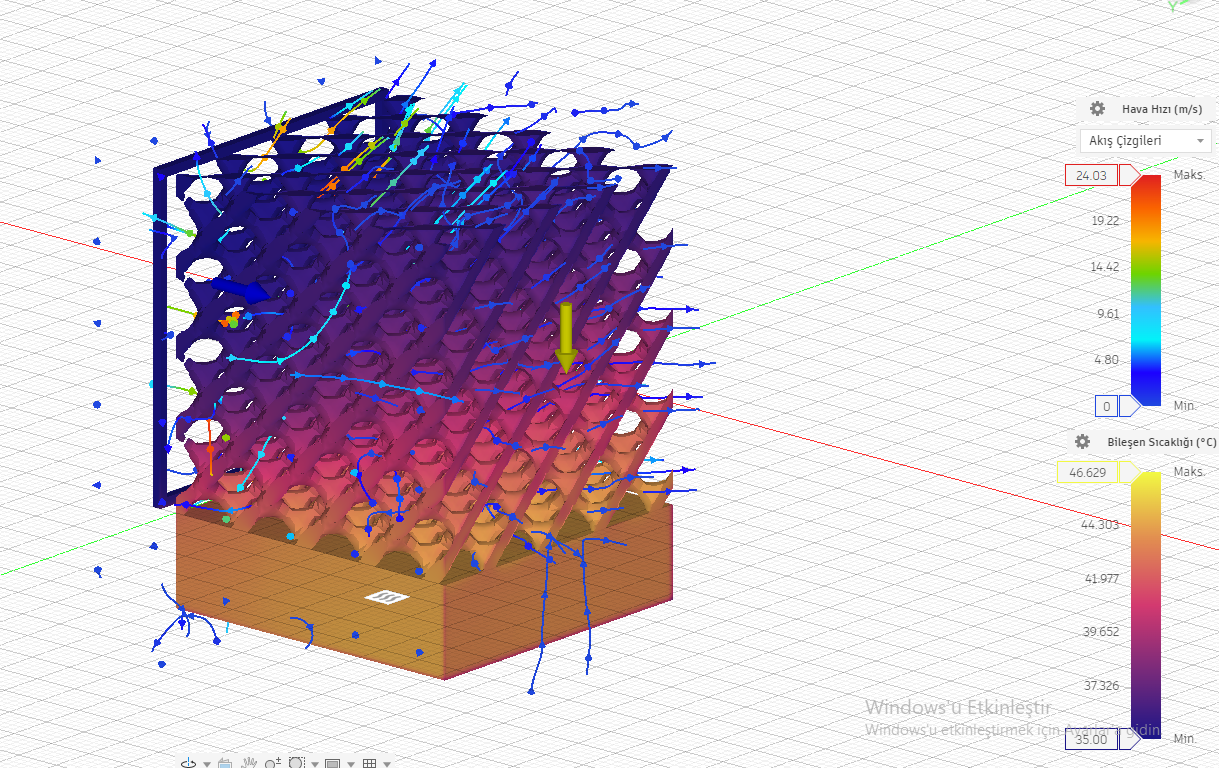
With forced airflow, convection resistance drops significantly and the lattices become viable heat sinks. Here the geometry differences show up as thermal margin.
Gyroid — 1 CPU (With Fan): Pass
(20.20 m/s, 47.274°C)
Schwarz-D — 1 CPU (With Fan): Pass
(24.03 m/s, 46.629°C)
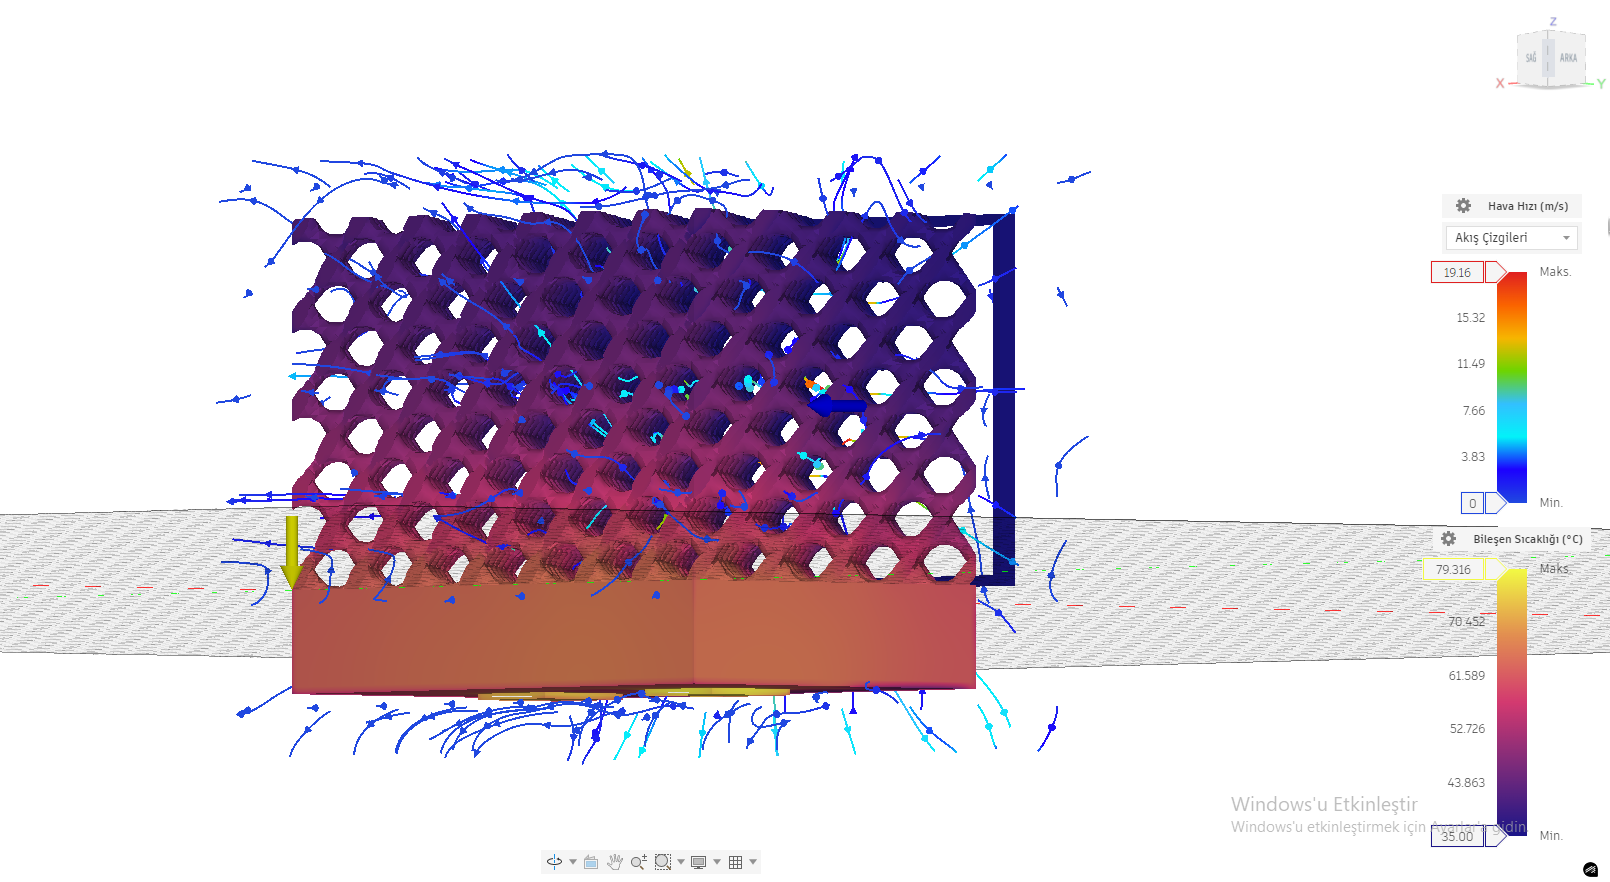
Gyroid — 2 CPU (With Fan): Pass
(19.16 m/s, 79.316°C)
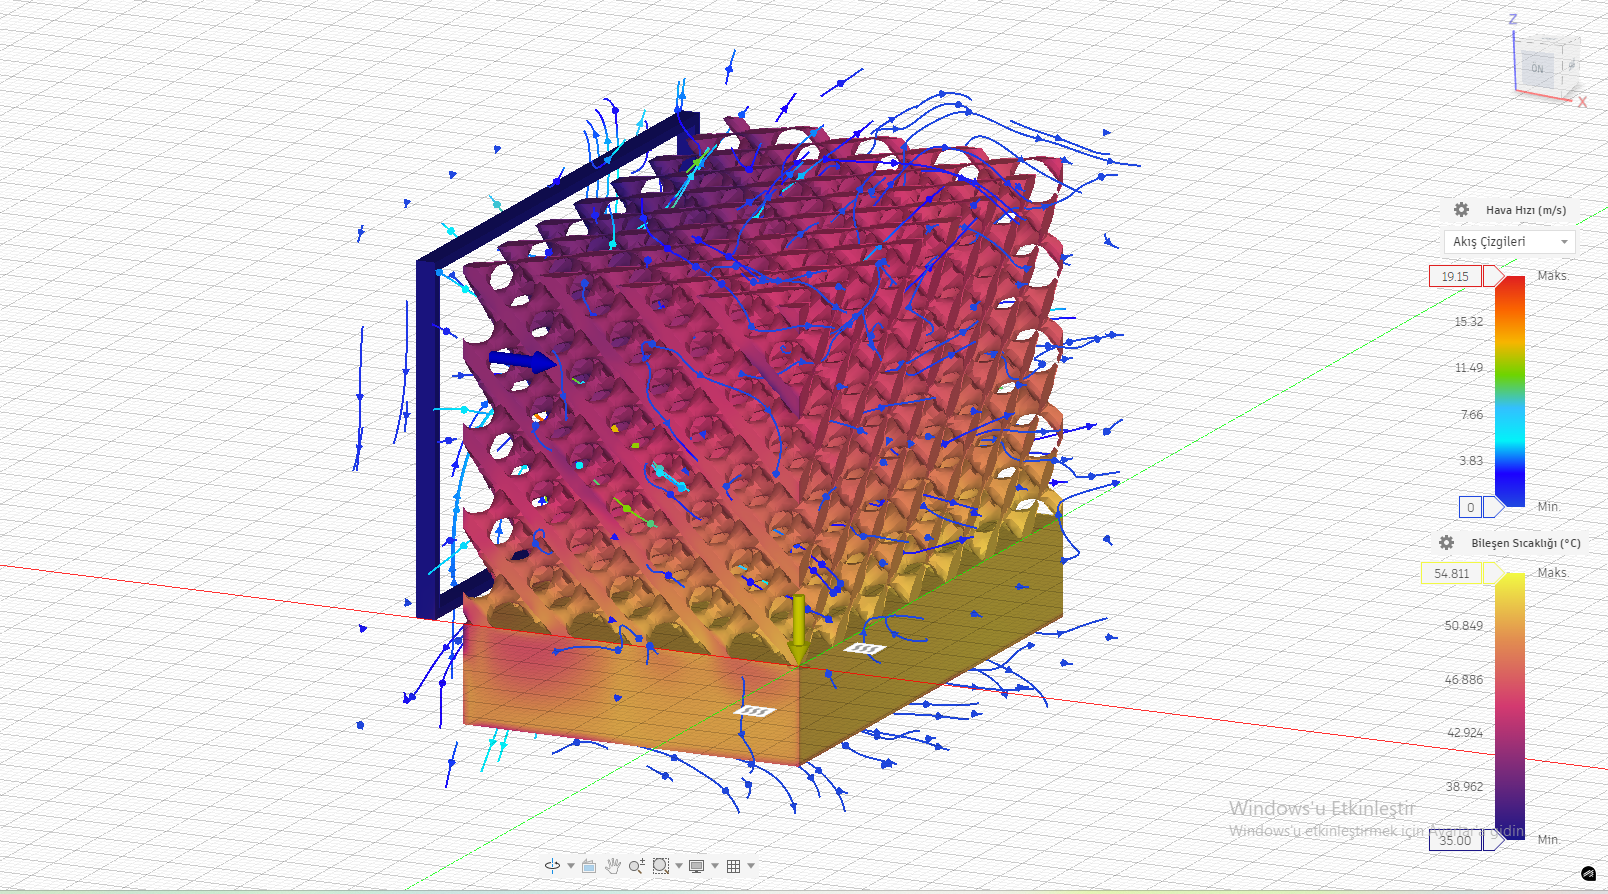
Schwarz-D — 2 CPU (With Fan): Pass
(19.15 m/s, 54.811°C)
Results Table
| Scenario | Geometry | Cooling | Max Air Velocity (m/s) | Max Component Temp (°C) | Result |
|---|---|---|---|---|---|
| 1 CPU | Gyroid | No Fan | 0.25 | 165.614 | Fail |
| 1 CPU | Gyroid | With Fan | 20.20 | 47.274 | Pass |
| 1 CPU | Schwarz-D | No Fan | 0.27 | 161.853 | Fail |
| 1 CPU | Schwarz-D | With Fan | 24.03 | 46.629 | Pass |
| 2 CPU | Gyroid | No Fan | 0.28 | 191.817 | Fail |
| 2 CPU | Gyroid | With Fan | 19.16 | 79.316 | Pass |
| 2 CPU | Schwarz-D | No Fan | 0.26 | 199.002 | Fail |
| 2 CPU | Schwarz-D | With Fan | 19.15 | 54.811 | Pass |
Conclusions (Engineering Decision)
- Without forced convection: both lattices fail in both 1-CPU and 2-CPU configurations due to convection dominance (low airflow).
- With forced convection: both lattices pass for 1-CPU, but the 2-CPU case differentiates designs:
- Gyroid passes with smaller thermal margin (79.316°C)
- Schwarz-D passes with large margin (54.811°C)
Final recommendation: Schwarz-D + forced convection is the most robust configuration, especially under dual-source loading.
What I personally did (ownership)
- Built the correct 1-CPU and 2-CPU thermal resistance networks and translated them into a solvable MATLAB model.
- Used CAD-derived effective areas to compute convection sizing (required (h) to meet the temperature rise budget).
- Ran and interpreted Fusion 360 flow + thermal results and tied the outcomes back to the resistance network physics.
- Produced a decision-ready trade study with clear Pass/Fail outcomes and supporting evidence.